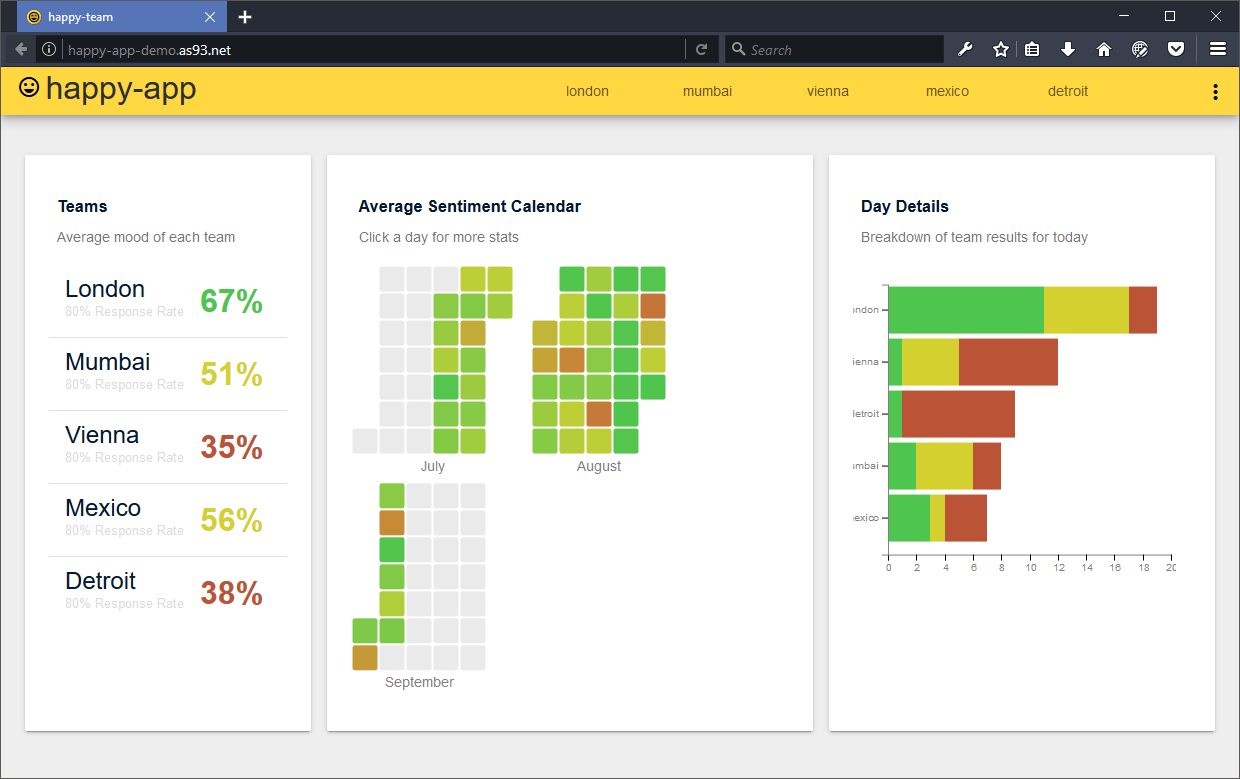
AS93

12
2
9 MB
Jun, 2017
1 year ago
JavaScript

Happy App

Anonymously gauge and monitor the sentiment of your team
😄

Contents

  1. About
  2. Technical Documentation
  3. Project Planning
  4. Legal

⚠️ Notice: App is depricated, and no longer maintained. See alternatives.

Introduction

Happy App finds out how team members are feeling about their project, and visually displays results.

Scheduled emails are sent out to every member at a given time, containing an embedded poll, making submitting responses effortless. All responses are anonymised, encouraging team member to be honest. The dashboard displays a summary of results in a series of data visualisations, showing:

  • Overall team sentiment for today
  • Sentiment change over time
  • Sentiment by team

It's built as an Angular app, and uses D3.js for the charts.


Demo

A live demo is available at: happy-app-demo.as93.net

The demo uses automatically generated sample data (where teams have been given random city names), and scores are totally random.

Watch Demo Video


Screen Shots

Home Page

Homepage

Team Page

Team Page

Mobile Views

Mobile


Deprication Notice

This app was developed in 2016/17, and is now outdated.

Instead, there are several paid solutions that are much more effective than this app, for example: Team Mood, Geekbot Sentiment, Team Sentiment Tracker, Team Retro.

Alternatively, you can fork this project and continue to use it without support.


Contents

  1. About
  2. Technical Documentation
  3. Project Planning
  4. Legal

Technical Documentation

Development Setup

Setting up the project for development is done in the standard way.

The steps are as follows:

  1. Clone the repo, and cd into it
  2. yarn install the npm node dependencies, and frontend dependencies
  3. Connect to mongo, mongod. See the Getting Started page on MongoDB documentation.
  4. Populate the database with some sample data (optional). gulp populate-sample-data (See Data section for more info)
  5. Start the development server, npm run dev. This watches, compiles and refreshes appropriate server and client components.

Production Setup

  1. Clone or upload the files to your server directory
  2. Run yarn, to install the npm and frontend modules
  3. Create a .env file in the project root, and populate it like the example below
  4. Setup and start a mongo instance, and configure the port appropriately in the .env
  5. Build the produciton version, with npm run buil:prod
  6. Run npm run test to verify that everything is working as expected
  7. Start the app (using a forever or pm2 to keep it alive), forever start node server
  8. Set up a cron job or similar to start the app on server reboot

Example .env file. Will need populating with valid API keys.

NODE_ENV=production
PORT=3001
ROLLBAR_KEY=123abc
NEW_RELIC_APP_NAME=happy-app
NEW_RELIC_LICENSE_KEY=123abc

API Docs

The frontend accesses it's data through the set of functions exposed by the backend. There are GET routes for just returning data, and POST routes which update/ add new data, and require authentication.

All API calls are made from BASE_URL/api/, where BASE_URL is the URI of the app root (e.g. 'localhost', IP address or the domain pointing to main app)

/teams

Returns an array of all teams referenced to in the datasets

  • URL: /teams/
  • Method: GET
  • URL Params: none
  • Success Response:
    • Code: 200
    • Content: ['team-name1', 'team2', 'three', 'forth-team']
  • Error Response:
    • Code: 200
    • Content: []

/team-sentiment

Returns all recorded sentiment for all teams

  • URL: /team-sentiment/
  • Method: GET
  • URL Params: none
  • Success Response:
    • Code: 200
    • Content: {teamName: '', data: { [.....] }} (See the above section on data format)
  • Error Response:
    • Code: 200
    • Content: {}

/team-sentiment/:team-name

Returns all recorded sentiment data for any given team

  • URL: /team-sentiment/:team-name
  • Method: GET
  • URL Params: teamName (the name of the team, as a String)
  • Success Response:
    • Code: 200
    • Content: {teamName: '', data: { [.....] }} (See the above section on data format)
  • Error Response:
    • Code: 200
    • Content: {}

/team-members

Returns all member hashes for each team. Requires authentication.

  • URL: /team-members
  • Method: GET
  • URL Params: none
  • Success Response:
    • Code: 200
    • Content: ``
  • Error Response:
    • Code: ``
    • Content: {}

/save-response

Checks and saves the response for a given user hash.

  • URL: /save-response
  • Method: POST
  • URL Params: { emailHash: '', score: 'good', comment: ''}
  • Success Response:
    • Code: 200
    • Content: ``
  • Error Response:
    • Code: ``
    • Content: {}

Data Structures

All data is anonymised, a one-way hash is created from the users email address, which is used by the system to uniquely identify them, but this is not displayed to users/ admins.

User data is represented in the following JSON format:

teamName: (String)
data: (Array)
---date: (Timestamp)
---userResults: (Object)
------userHash: (StringHash)
------score: (String)
------comment: (String)
For example (click to expand)

Example JSON:

[
  {
    "teamName": "team-name",
    "data": [
      {
        "date": 1495273151191,
        "userResults": [
          { "userHash": "USR28JD83H3DKDS", "score": "good", "comment": "" },
          { "userHash": "USRCJD93JD93JD9", "score": "good", "comment": "fun team lunch" },
          { "userHash": "USRNC983JD93JSM", "score": "average", "comment": "" },
          { "userHash": "USRJCI3NDX923JC", "score": "bad", "comment": "too many meetings" },
          { "userHash": "USRNZZK1SD251CS", "score": "average", "comment": "" }
        ]
      },
      {
        "date": 1495273223108,
        "userResults": [
          { "userHash": "USR28JD83H3DKDS", "score": "bad", "comment": "" },
          { "userHash": "USRCJD93JD93JD9", "score": "good", "comment": "" },
          { "userHash": "USRNC983JD93JSM", "score": "good", "comment": "fast progress" }
        ]
      }
    ]
  }
]

see more...

For development, a random set of data can be generated (using a tool such as json-generator), with a definition similar to the one below:

[
  {
    'repeat(4,6)': {
    teamName: 'team-{{city()}}',
    data: [
      {     
       'repeat(45,90)': {
        date: function (tags, parent, index) {
           var d = new Date();
           return d.setDate(d.getDate()-index);
        },
            userResults: [
                {
                'repeat(6,30)': {
                userHash:function(t,p,i){ return parseInt((i+1*i)*75+10, 16); },
                score: '{{random("good", "average", "bad")}}',
                comment:''
                }
              }
           ]
        }
      }
    ]
  }
  }
]

To populate the database with either randomly generated data, or exported JSON, run:

gulp populate-sample-data

By default this generates a set of random, but reasonably realistic sample data, the parameters of which were defined in the populate-demo-db.js file. Alternativley, the path of previously generated or exported data can be specified, and the database will be populated the that data. An example filename parameter may look something like this: /tasks/setup/sample-data.json.


Error Handling

Errors are tracked, monitored and handled using Rollbar. An API key is required, and needs to be added into the .env file, as ROLLBAR_KEY. If no key is specified, all Rollbar events will just be skipped.

The error tracking code is in /server/commons/error-tracking.js. So to swap Rollbar out with something else, such as TrackJS or ErrLytics, this Should be the only file which needs modifying.

To use, first include the above file: const rollbar = require("../../commons/error-tracking"); Then either log a message, like: rollbar.logMessage("Team List returned", teamNames); Or in an error catch block, log the error, like: rollbar.logWarning("Unable to fetch team list", err);

Rollbar also catches and manages client side errors, and is initialised in client/app.module.ts.


Analytics and Tracking

angulartics2 is ued to implement Google Analytics and Google Tag Manager. The tracking is managed in analytics-tracking.service.ts. A function similar to the one below can be used to track events:

trackAnalyticEvents(action, properties = {}){
  this.angulartics2.eventTrack.next({ action: action, properties: properties});
}

As well as ths, the standard GA / GTAG code snipped it in the client/index.html.


Mobile App

There is no mobile app companion for happy-app.

Though it was built as a Progressive Web App, and makes use for service workers for basic offline functionality. It's also fully responsive so displays nicely across all screen sizes.


D3 Charts Info

Each D3.js is in it's own component, so should be able to be implemented anywhere in the application, and managed centrally. See overview-chart.component.ts for an example. Team data is managed centrally in
team.service.ts and each chart listens for changes in this service and updates accordingly. All the D3 chart components follow the same structure. There are (currently) six charts:

  • calendar-chart - Detailed calendar breakdown for a given team
  • day-breakdown-chart - Breakdown of sentiment results between teams for a given day
  • grid-chart - High-level overvier of average sentiment for all teams
  • message-chart - Visual display of annomised team-member comments for each team
  • overview-chart - Donut chart showing proportions of sentiment for a given team
  • time-chart - Shows sentiment over time, for a given team

Tech Stack

The app uses a fairly standard MEAN (Mongo, Express, Angular 4, Node) stack, with D3.js for the charts, and isomorphic rendering with Angular Universal.

Show Full Tech Stack:

The majority of it was written in/ with SASS/SCSS (for the styles), TypeScript (for client-side JS), Babel (for server-side JS) and handlebars (for non-Angular HTML).

Several utilities proved to be a vital help, when carrying out common tasks, mostly Bluebird and Q (for promises), dotenv (for managing environmental variables), RxJS (mainly for event binding in Angular), and of course Mongoose for making Mongo super easy to work with.

Testing the app, was made possible using combination of frameworks and libraries. Cucumber (for specifying BHD tests), Protractor (for E2E Angular testing), Karma (for running the unit tests), Mocha (for running server-side tests), Chai (for writing the server side tests), Istanbul (for checking test coverage), Code Climate (for checking code quality is on point), Sinnon.js (for stubs and spies), Davis DM (for checking dependencies are u2d) and Phantom (was initially used for headless browser testing).

Detailed analytics are collected with [Google Tag Manager (GTM)], and application errors and warnings are tracked with Rollbar.

TechStack


File Structure

happy-app
│   README.md
│   package.json    
╰───client
│   ╰───dev
│       │───components
│       │───pages
│       │───services
│       │───styles
│       │───graphics
|       |   app.module.js
|       |   app.ts
|       |   config.js
|       |   index.html
|       |   main-jit.ts
|       |   main-aot.ts
|    ___|   manifest.json
|   |   
│   ╰───dist
│       ╰─── ...     
└───server
|   │───api
|   │───auth
|   │───commons
|   │───config
|   │───constants
|   │───routes
|     │   error-tracking.js
|     │   index.js
|     ╰   server.js
╰───tasks
|
╰───tests

Test Environment

In order to develop high quality software, thorough testing is essential.

This section is a high level presentation of the test approach to be undertaken in relation to Happy App.

Test Driven Development

This is a process where the tests are written before the code is developed. The test cases are written based on the user stories, and most the logic on the application is developed in the tests, so when it comes to writing the code it should be a very quick process.

TDD was chosen as the testing methodology, as it has several key advantages. Firstly it will ensure the code that is written is structured, as the structure must be determined before the code can be written. Secondly it helps the code fit with the user stories, since the tests will be based from the user stories. It also creates a detailed specification. Most importantly less time is spend debugging and fixing bugs, as code is written to pass tests.

Unit Testing

Unit testing involves writing a series of very thorough tests to cover each module, function or method independently as a unit. Each function should be checked that it produces the expected output with a variety of hardcoded inputs. This should include testing error handling, and borderline and unexpected inputs. After the unit tests have been written the unit test process can be automated, so every time a method is changed, the tests are rerun to check that it still produces the correct output with various inputs.

Unit testing has a lot of benefits to software development, firstly any potential bugs or failures will be identified before that function gets integrated with the larger application. Developers can verify their code still works as expected as they refractor and change parts, in the same way, unit testing can prevent future changes from breaking functionality. It also helps you understand your code, and gives you instant feedback when something is not working as it should be.

Behaviour Driven Development

This is the same principle as TDD, but involves writing tests with a more functional point of view. The syntax used to write the tests tends to be more like English, and the tests follow very closely to the user stories. Following BDD will ensure that the code written follows user stories, so as long as they are complete, then the finished solution should also be thorough.

Pass/ Fail Criteria

Test Type Pass Condition
Functional Testing All acceptance criteria must be met, checked and documented
Unit Tests 100% of unit tests must pass. It will be immediately clear when a unit test is failing
Integration Tests 100% pass rate after every commit
Coverage Tests 80% or greater
Code Reviews B grade/ Level 4 or higher. Ideally A grade/ Level 5 if possible.
Dependency Checks Mostly up-to-date dependencies except in justified circumstances.

Documenting Results

A ststus of all unit tests, coverage tests, dependency checks and code review will be displayed in the form of badges on the repository readme. Each will be linked with the appropriate service, so will update live. This will indicate immediately as soon as a test is failing or a dependency becomes outdated.

Detailed test reports for each testing method will also be generated and saved.

Testing Tools

Framework (with Mocha)

Mocha is a feature-rich and well established JavaScript testing framework. A JavaScript framework is required in order to store, write and run the tests in a structured way. Using a framework will also make using various testing plugins easier to use neatly.

Assertion Library (with Chai)

An assertion library will provide structure and syntax in order to actually write the test cases. Chai is a good choice, as it fits nicely with Mocha, and has a very flexible syntax, including a �should� library built in, which will allow for tests to be written in a BDD style.

Coverage Testing (with Istanbul)

Coverage testing measures the proportion of your source code that is covered by your unit tests. It can be very helpful while developing as it makes it easier to aim for as close to 100% as possible. It also highlights the code that is not covered by unit tests. For this project Istanbul will be configured to show a coverage summary in the console when a test or source code file changes, it will also generate a much more detailed HTML report that will be saved in the reports directory.

Stubs, Spies and Mocking (with Sinon.js)

For the tests, it is not good practice to have any network calls, so Sinon.js will be used to stub the data that would have been returned for each network call. Spies will also be used to test the functionality of methods.

Continuous Integration Testing (with Travis CI)

Since the code will be written following a very modular approach, and each module will be thoroughly tested standalone but it is of course vital that they work together seamlessly as they are meant to. A Travis CI configuration file will be written in a Yamel format, which will specify to Travis which tests need to be run in order to ensure the code is working as it should, and which versions of Node (and other technologies) the code will need to be run on. Then every time a new commit is made Travis will run tests to ensure everything continues to pass, and the code repository is not broken by the latest commit.

Dependency Checking (with David)

Since there are quite a few external dependencies that come together to make each component of the project possible, it is important to ensure that all the current dependencies are stable and have no bugs that could effect the running of TSV. For this automated dependency checking will be implemented with David-DM. When a dependency is no longer in date an notification will be triggered.

Automated Code Review's (with Code Climate)

Code reviews can pick up on bad practices and inefficient code, such as including dependencies and not using them, variables in the wrong scope, poor identifiers, not following convention etc.. All of this information can help write better quality code. Code Climate also provides automated coverage testing in conjunction with Istanbul.

Headless Browser Testing (with PhantomJS)

For running functional frontend tests without having to use a browser, it can be automated in the same way as the other tests and can test the integration with other frontend libraries. PhantomJS also provides network monitoring utilities that can help cut down page load times.

Testing HTTP services (with SuperTest)

SuperTest is an agent driven library for testing node.js HTTP servers using a fluent API. It will be used for testing HTTP servers. It will be used to check the routing for the Express web service, to ensure with a given URL and parameters returns the expected output.


Project Planning

High-Level Flow Chart

Flowchart


Wireframes

Wireframes


High-Level Functional Requirements

Mail Scheduler

The system the sends out periodic emails to team members, collects, verifies, formats and inserts results

  • Maintains a list of email addresses for each member of each team
  • Generates unique data-collection links ( associated with email address, timestamp and mood)
  • Sends emails at a specified time on given days (e.g. 4pm Mon- Fri)
  • Verifies that users response is valid (from team-member email, and not already submitted within timeframe)
  • Inserts team members response into the database

View Responses (Individual Team)

A series of data visualisations to display team mood

  • Overview chart. A very simple proportion (donut) chart, showing overall percentages. Should allow the user to switch between displaying results from today, this week, and this month.
  • Time chart. A line chart showing team sentiment over-time. Should allow the user to switch between aggregate (one line representing overall sentiment), and breakdown (line for each sentiment).
  • Calendar view. A detailed month-view calendar, showing the number of responses for each sentiment per day, with hover tooltip to view comments (if applicable) for each response.
  • Comment view. Show's in plain text the comments, sorted by most recent first.
  • Sentiment word cloud. Generated from comments, size of word represents number of occurrences, colour represents sentiment.
  • Grid view. Grid to show responses over time, the primary use of this is to gauge what percentage of team members consistently respond to the survey.
  • Stats view. Numeric value, displaying the worst and best day, highest and lowest participation day.

View Responses (All Teams)

The homepage will provide entry point to the application, as well as a quick overview of each team

  • List all teams, as links to their team response page
  • Show small overview for each team
  • Time Grid. The primary data visualisation for the homepage, is a grid, with row for each team, and column for each day, coloured by response.

Admin Dashboard

Allows team admin to modify certain application settings and maintain the team member list

  • Should be secured, only accessible using admin credentials
  • Should allow the admin to modify when emails are sent out (times and days)
  • Should allow admin to add and remove team email addresses on the distribution list

Licensing Summary

Happy App is licensed under the Fair Source 5 License. It is neither open nor closed source, the code can be viewed by anyone, but it can not be used, without written permission for any organisation over 5 users. See http://fair.io/ for more information.

License

Fair Source License, version 0.9 Copyright © 2017 Alicia Sykes

Licensor: Alicia Sykes

Software: Happy App

Use Limitation: 5 users

License Grant. Licensor hereby grants to each recipient of the Software (“you”) a non-exclusive, non-transferable, royalty-free and fully-paid-up license, under all of the Licensor’s copyright and patent rights, to use, copy, distribute, prepare derivative works of, publicly perform and display the Software, subject to the Use Limitation and the conditions set forth below.

Use Limitation. The license granted above allows use by up to the number of users per entity set forth above (the “Use Limitation”). For determining the number of users, “you” includes all affiliates, meaning legal entities controlling, controlled by, or under common control with you. If you exceed the Use Limitation, your use is subject to payment of Licensor’s then-current list price for licenses.

Conditions. Redistribution in source code or other forms must include a copy of this license document to be provided in a reasonable manner. Any redistribution of the Software is only allowed subject to this license.

Trademarks. This license does not grant you any right in the trademarks, service marks, brand names or logos of Licensor.

DISCLAIMER. THE SOFTWARE IS PROVIDED “AS IS”, WITHOUT WARRANTY OR CONDITION, EXPRESS OR IMPLIED, INCLUDING BUT NOT LIMITED TO WARRANTIES OF MERCHANTABILITY, FITNESS FOR A PARTICULAR PURPOSE AND NONINFRINGEMENT. LICENSORS HEREBY DISCLAIM ALL LIABILITY, WHETHER IN AN ACTION OF CONTRACT, TORT OR OTHERWISE, ARISING FROM, OUT OF OR IN CONNECTION WITH THE SOFTWARE.

Termination. If you violate the terms of this license, your rights will terminate automatically and will not be reinstated without the prior written consent of Licensor. Any such termination will not affect the right of others who may have received copies of the Software from you.